
How To Make Latte Art At Home
Do you want to learn how to make latte art at home? Whether you’re looking to “wow” guests, snap the perfect Instagram shot, or just brighten your own day with a little coffee treat, latte art is the perfect hobby that you can learn. I mean, sift through some of the most famous and incredible latte art; yeah, you can do that!
...with a little practice.
So, how can you start making latte art right in your own kitchen?
In this article, we’re going to bring you through the basics of how to brew the perfect cup, as the foundation of your latte art. Then, we’ll teach you how to create the latte art trifecta: a heart, a tulip, and a bunny.
1. Get the tools
With the right tools, the perfect latte art is just a pour away!
Coffee maker:
It’s easiest to make latte art if you have an espresso machine at home, mostly because that makes it easier to steam the milk. But, an espresso machine isn’t necessary. You can get the same effect with a French press, or a Bialetti moka.
Milk pitcher:
You’ll want to own a milk cup with a thin, pitched spout. This allows for greater control of your pour. You can buy inexpensive milk pitchers from just about any box store.
Cup:
Your coffee mug should be wide, so you have plenty of space to create your art. Shallow cups are also better for beginners, because you can layer the cream easier as the foundation.
2. Start with the coffee
It doesn’t matter how beautiful the latte art is if the coffee doesn’t taste good! So, you’ll want to start with a strong espresso roast, like our Café Eldorado Espresso, or our popular Havenero Espresso. We also recommend grinding your coffee fresh at home. This creates a crisp flavor that works beautifully for espresso and cappuccino.
Pull your espresso as you normally would. If you are using a French press, you may want to make a little extra coffee, since the result typically isn’t as strong as an espresso maker.
3. Choose your milk
We usually recommend using whole milk, because it’s the thickest and creamiest milk to work with. The thicker the milk, the easier it is to froth and use as “paint” for your art. If you can’t have dairy, then soy milk and oat milk also work well, since they’re on the thicker side.
You’ll need about three ounces of milk per cup of espresso coffee.
4. Froth the milk
If you’re using an espresso machine:
- Aerate the milk for about three seconds, by resting the steamer wand at the top of the milk in the pitcher.
- Submerge the steamer wand in the milk, to heat it to between 140 and 160 degrees. The milk should be mostly quiet at this point. If it’s screaming or screeching, you may be over-aerating the milk.
- The wand should be in the middle of the milk pitcher, with the pitcher leaned slightly. This helps create that whirlpool effect that breaks down larger bubbles for smooth, rich milk.
If you don’t have an espresso machine:
- You can foam up your milk in the microwave. Heat the milk in a microwave-safe pitcher for about 30 to 60 seconds, until the milk is between 140 and 160 degrees.
- Put the milk in an empty French press (coffee should already be in the mug). Use the French press pump to foam up the milk. Don’t over-pump the press or the milk will become too thick.
Once the milk is hot and frothy, you’ll want to gently swirl the milk pitcher, and tap it lightly on the counter to help knock out the bubbles. This will give the milk a silky, rich texture that’s completely irresistible.
5. Layer the cream “foundation”
We like to call this step the “foundation,” because you’re pouring cream into the coffee itself to create a thick bottom layer. If you try to create latte art without this foundation of cream, you’ll lose a majority of your design to the rest of the coffee cup.
You’ll probably end up pouring about 80 percent of your steamed milk into the cup as the foundation before you start the latte art itself. You’ll want to pour it directly in the center of the cup to mix the milk into the coffee.
When pouring, tilt the coffee cup sideways slightly. This will give you more control while creating your art.

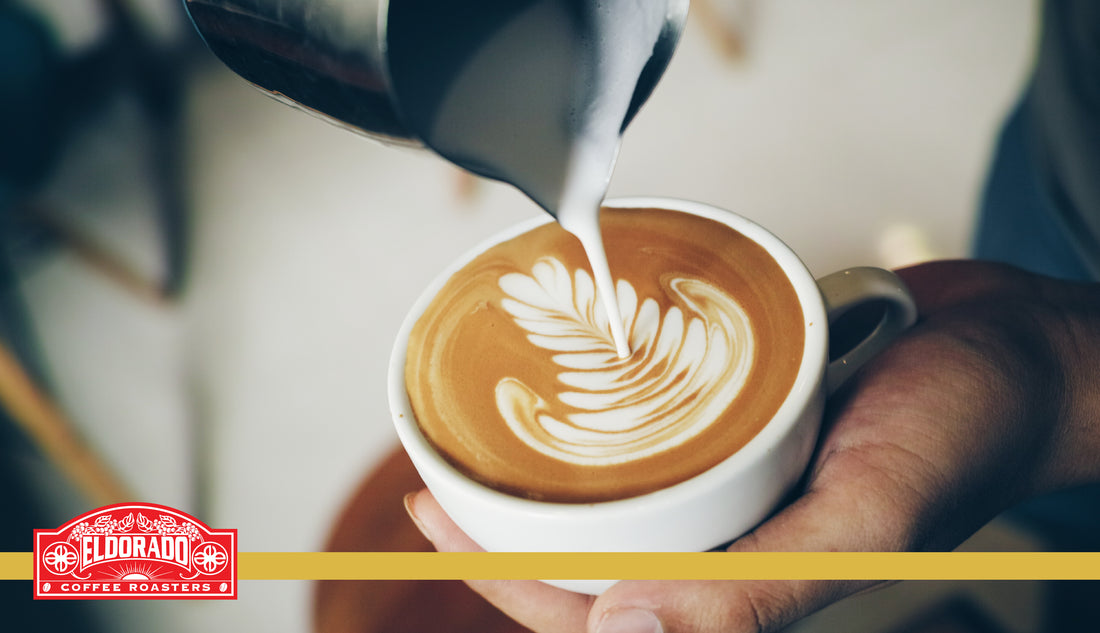
Heart Latte Art
The basics are done, and now’s the fun part… the latte art! Let’s start with the most basic shape: the heart.
While still pouring, bring the pitcher down so it’s pouring close to the surface. Rock the pitcher quickly from side to side, to create a round shape.
Once the cream looks rounded, pull the pitcher in a straight line down the middle, pushing away from you. This will pull the milk down to form a heart!
Now, your coffee is ready to serve to a loved one (yourself included)!
Note: Keep your movements small and controlled. Lifting the pitcher will thin the stream while bringing it closer to the mug will result in a thicker line.
Tulip Latte Art
The tulip is essentially three stacked hearts.
Get close to the edge of the cup, like you would to create the rounded edge of the heart. Only rock back and forth three to four times. Then, quickly stop pouring, pull back slightly, and pour with two to three shakes to create a smaller circle on top of the larger one.
Do that a third time to create an even smaller circle at the top, with one to two movements back and forth. While still pouring, pull the pitcher slightly away from the surface cup to create a thinner line. Pour down the center of all three circles. This will cut through the three layers to create a gorgeous tulip shape.
Psst… The tulip is our favorite for a stunning Insta-worthy photo op!
Rabbit Latte Art
No one can resist a cute little bunny in their coffee—and, it’s not as hard as it looks.
Hold the milk pitcher about an inch above the coffee cup, pouring the milk at the cup’s edge that’s closest to you. Then, shake the pitcher side to side to create that rounded shape, like you did with the heart.
With the heart, you’re pulling the pitcher towards the edge of the cup. But, with the bunny, bring the pitcher towards the center of the cup. This creates the outline of the bunny, with two cute bunny ears.
Now, you’ll need something with a fine point. You can purchase latte art tools, or simply use a wooden skewer, or a clean safety pin. Put the pen just below the ear to create an eye. Do it on both sides, under both ears. Between and beneath the eyes, draw four lines out from the center for his whiskers.
Now, you have an adorable bunny that will really wow your friends!

Latte Art Tips
- You want to be close to the surface of the coffee to make your art. Leaning your cup slightly to the side helps bring the pitcher closer, so you have more control of your design. This also allows you to pour slower, and take your time creating the art.
- We recommend holding your cup at the bottom or from the side, to maintain the most control while pouring.
- Practice, practice, practice. You won’t get it right the first time, but it will soon come to you. You can even film yourself pouring, so you can analyze your moves.
- Go to your local coffee shop, and ask a barista to show you how to do it in person. (Visit during a slow period, not in the morning rush.) They’ll be excited to show you what they know!
How To Make Latte Art At Home
Our favorite thing about latte art is that it’s art, so everyone’s pour will be unique and different. Your coffee heart will look different than your barista’s, which will look different than your friend’s.
Latte art takes a little bit of practice, but it’s easy to master—and super fun to play around with. It brings a whole new dimension to making lattes and cappuccinos at home, that will make your day brighter… and surprise your guests!
Remember that the best cup of coffee should taste as good as it looks. Check out our selection of beloved espresso blends to make the perfect cup, each and every time.